Sunday, October 20, 2013

Principles of Design

Course Overview

All of the baking and pastry art students at the Culinary Institute of America are required to take a class called Principles of Design. It was a lot of fun! My class works well together, so that made this class that much better. We would show up early, listen to the professor's lecture of what we would be working on for that day, and then get to work on our projects. We were allowed to wear headphones and listen to music in class, which, to me, was awesome; I was off in my own little world during class. To get into my creative mindset, I usually listened to:
Alabama

The Battlestar Galactica Soundtrack

Billy Idol

Boston

Coldplay

Fleetwood Mac

Pink Floyd

The late, great Warren Zevon

Radiant Image Project

The objective for this project was to create movement on a two-dimensional plane and illusion of three-dimensional space (depth), while using basic color theory.


Total Contrast Project

The objective for this project was to develop a composition that focuses on the push/pull aspect of contrast, using unit forms that full in the entire picture plane and create and uninterrupted pattern.

Block Print Project

The objective for the first part of this project was to develop a unit form that, when repeated in a simple grid pattern, creates a cohesive arrangement. The second objective was to produce designs that integrate color scheme or theme in a unified composition.

The prints are now hanging in my office,which puts a smile on my face every time I see them.

Logo Design Project

The first objective was to design an iconic image that represents a person (or persons), property (a place of business) or product (an object, preferably a food item). I didn't know what to do for a long time. But then it popped into my head that I should do this project for my niece, Hayleigh Rose.


 Pink (Hayleigh's favorite color)

 Green & Gold (The Culinary Institute of America's colors)

 Multicolor

 I made a few additional cuts on my master stencil to add a bit more color to the flowers.
Red
 Blue

Sculpture Project 

The first object of this project was to design a theme-based three-dimensional object using the constructivist approach to sculpture. The next objective was to construct a small sculpture consisting of basic forms from plastic material, using a specified format and following an original, theme-based design. I used expressionism in creating my sculpture. 

Comparative Paper

This assignment required that I find "a single dessert item of exceptional artistic merit" and another non-food image. After I found the images, I was to discuss in a compare-and-contrast manner using design terminology - elements, principles, color terms, and other information that were presented in class lectures and during demonstrations.

Final Essay: The Comparative Paper

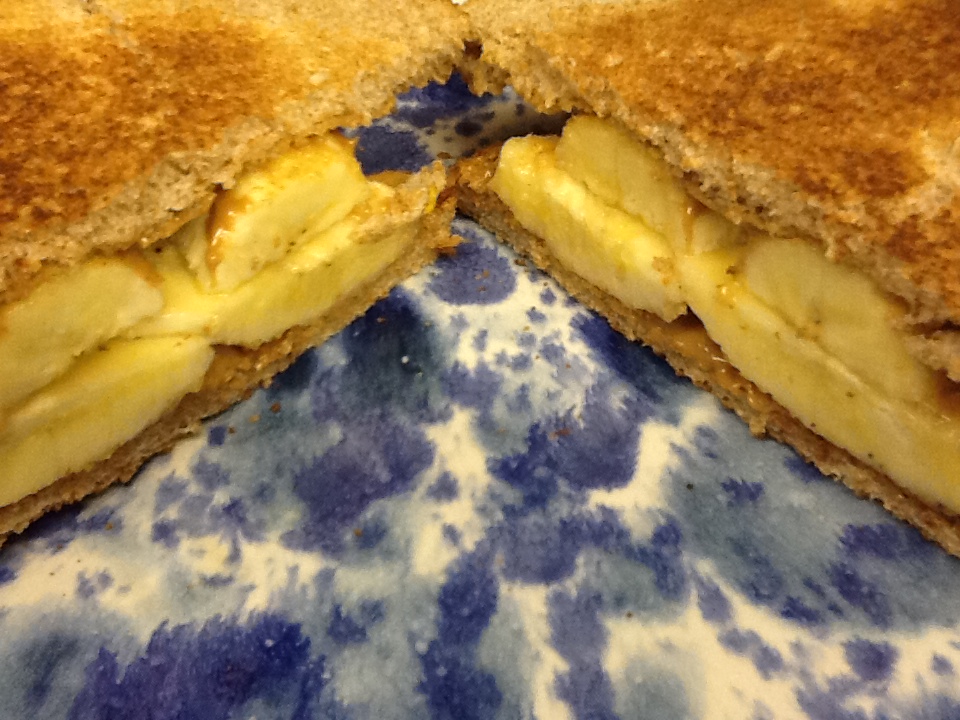
     Ice cream is, by far, my favorite dessert. And eating a banana split is my favorite way to enjoy the creamy, cold comfort food. So, it didn’t surprise me much that when I started looking at pictures of desserts to complete this project that I was drawn to find what my heart, and stomach, desire most. After searching extensively (as well as making and eating a few banana splits myself), I finally found a photograph worthy to be included in this report. 
 “Going Bananas!!!”
photo credit: Daniel Y. Go via photopin cc
As I looked through photographs of banana splits, I noticed that the majority of these shots had a banana split into two halves, lengthwise, which created perfect symmetry. This reminded me of the shape of a canoe. As a boy, growing up in Ohio with my grandparents, mother, sister, and brother, I would often walk out to the pond and canoe by myself, or with another member of my family. So, with my knowledge and experience of canoeing, I began to look for a photograph that I could compare and contrast with “Going Bananas!!!”. 
I graduated from Jacksonville State University in May of 2012 with a Bachelor of Science with a major in Geography and a minor in Anthropology. During my studies at JSU, I worked for the school and with Dr. Harry O. Holstein who is the Professor of Archaeology/Anthropology. I assisted students and staff in general field excavation procedures and conducted intensive field research on locating, mapping, and documenting Native American Sacred Stone Structure sites in Northeast Alabama. And Dr. Holstein always told me that Native Americans built the best canoes. My search for canoes quickly turned from shiny metal and fiberglass construction to old-fashioned, wooden Native American canoes. I found a photograph of Native Americans in a canoe that has both similarities and differences to “Going Bananas”. 
“Hmmm, PC?”
photo credit: Patrick Dockens via photopin cc
            The images used in this project have many things in common and many other things that are dissimilar. As stated earlier, the shape of the banana is very much like the shape of the canoe. Also, the glass dish is canoe-like in shape. The banana ends are not, however, left to their full length, and therefore do not curve upward into somewhat of a point. The same holds true for the serving dish. There is a definite sense of volume in both photographs. Where the Native Americans occupy the canoe, the ice cream, the toppings, and the banana are enclosed in the glass dish.
Gravity is quite noticeable in “Hmmm, PC?”, as the viewer can see Guinness holding a canoe with five Native Americans and six paddles. There is also direction in this photo; you can see that Guinness is walking from right to left and the canoers appear to be paddling from the front of the canoe (bow) to the rear (stern). As for the banana split, gravity is noticeable in that the sauce is dripping down the side of the banana and the glass dish is sitting (and not floating above) the plate on the table. There is no direction in “Going Bananas!!!”.
There is a stark contrast between the two images when meaning is called into question. The banana split photograph is meaningless, and “Hmmm, PC?” conveys a crystal clear message to the viewer; Guinness is strong. He is so strong that he’s able to carry, with one arm, a canoeful of Native Americans and their paddles, with a smile on his face. This, to me, evoked an intellectual response. I found myself asking, “Why is Guinness so strong?” Is it because he has so many more feathers in his headdress, compared to his fellow canoers? More questions came to mind. How did Guinness become so strong? Does the strongest man always have to carry the canoe? Is Guinness the strongest person in the group? Where is Guinness taking them? Why is Guinness carrying the canoe in the first place? I was not stirred up intellectually when looking at “Going Bananas!!!”.
Balance and symmetry are important in both images. Aside from the tweel right of the cherry being larger than the tweel to the left of the cherry, the banana split is perfectly balanced. One can assume that the three scoops of ice cream are of equal texture, size, and shape, that the other half of the banana is on the backside of the ice cream, and that there is probably some chocolate sauce dripping from the backside. This would create symmetry, both lengthwise and width-wise. If Guinness happened to be in the canoe, my being completely subjective, I’m almost positive that he would be paddling on the starboard side, and this would create symmetry, again both lengthwise and width-wise. But because he is carrying the canoe, we will never know for sure. Balance is crucial for Guinness. Counting from bow to stern, Guinness is directly beneath the third Native American. The canoe would certainly tip forward if he had positioned himself in the exact center of the canoe (in between Native Americans 3 and 4). His not being in the exact center also conveys that the Native Americans in the canoe do not have anything stored out-of-sight in the stern of the canoe, next to the extra paddle.
            The colors, or hues, are very important in both images. The primary colors (red, white, and blue) are used in “Hmmm, PC?”, but, not surprisingly, blue is not used in the “Going Bananas!!!”. The yellow banana and canoe are lively, cheery, and motivational. Both images have a little bit of red in them; the cherry on top of the whipped cream, and the triangle pattern along the edges of the canoe. The cherry definitely energizes and commands attention, but, to me, the triangle pattern is less effective in keeping my attention.
            A banana split, in my humble opinion, should contain the following ingredients: ice cream (1 scoop chocolate, 1 scoop vanilla, 1 scoop strawberry), banana (1, split lengthwise with tips trimmed down to form a 90 degree angle and maintain the same thickness throughout), pineapple (fresh, cut into equal-sized chunks), strawberry (fresh, quartered), cherry (minimum 1, with stem/stems), chocolate (warm sauce), and whipped cream. “Going Bananas!!!” has most of these ingredients, but because there are no strawberries or pineapples visible I am assuming that they are not present. Therefore, to improve this banana split, I would have to add these ingredients and redesign it. I like how the banana is cut to my above mentioned specifications, so that would remain the same. The chocolate sauce drizzle is sloppy, so I would make mine with a distinct pattern. I do like the tweels added to the “Going Bananas!!!” banana split. But with tweels being so easy to make in size, shape, and texture, I would not accept the different-sized tweels pictured. I like how the glass dish gives the customer full-view of the tasty dessert, but I believe the edges may need to be a bit higher to ensure nothing is slopped out over the side. And last, but certainly not least, the cherry needs to be placed perfectly in the center of the whipped cream. Great care must be given to ensure that it is not tipped in any one direction; it must be both perfectly plum and level.
 
The professor asked to speak to me in the hallway a few hours after I had turned in the assignment. He said, "Your paper is AWESOME!" I was thrilled! I told him that I could have written a lot more, as there was so much going on in the two images. And he said that he could tell that I had really "gotten into it." Also, he complimented me by saying that if he had to show a group of students a paper that they should model their own paper off of, that it would be mine. It truly made my day! I was awarded full credit for this project - 15/15 points. 

Dessert Menu

The objective for my final project was to create a Dessert Menu prototype, utilizing materials and techniques experienced in the class, following individually chosen theme by applying elements, principles, and color considerations learned in the course. 
Being careful not to plagiarize, I had used a variation of the Starfleet insignia in each of my design projects.
photo credit: epmiali via photopin cc

So, in keeping with my course-long theme, I created a Star Trek Dessert Menu prototype. 

Front cover with the Great Seal of the United Federation of Planets
 
Inside

I chose to represent four different Star Trek races in my menu: Vulcan, Borg, Klingon, and Human.

Vulcan - Live Long and Prosper Apple Pie A la Mode
Our pies are made daily with fresh apples transported directly from planet Vulcan. Ice cream is made with our in-house replicators, and there are over 2,000 flavors to choose from.

 Borg - Tricorder Pie
This Delta Quadrant classic is loaded with crushed Starfleet tricorders, finely chopped bio-neural gel pack casings, class-4 probe buckling, navigation sensors, and nacelle discharge sockets. Plasma oil drizzle is available with no additional charge.

Klingon - Blood Pie
The heart of a true warrior longs for this tasty treat! Each slice contains at least 4 different types of blood. This dish is perfect with an after-dinner glass of Klingon bloodwine. 

Human - Cellular Peptide Cake with Mint Frosting
Chocolate cake with the best mint frosting in Starfleet!

The Dessert Menu was made from construction paper, and it was held together with rubber cement. The professor told me that, when grading the menus, he looks for things that he would make differently. He said that he wouldn't change a thing in my menu. Again, I was awarded full credit for this project - 15/15 points. 


Final Grade

I enjoyed Principles of Design, and I learned a lot from the course. My final grade was an A. I am very proud of myself for working hard and turning in some good work. The professor told me that he has about 300 students each year, and of those, only about 10 earn an A. To me, it is not about a letter grade; its about what I have learned and how I can apply it in what I am doing. So, I'm anxious to take what I have learned in this course and apply it to my next two classes: Basic and Classical Cakes and Individual & Production Pastries. 
 

Monday, May 27, 2013

My First Cheesecake

I moved in and began taking classes at The Culinary Institute of America on May 6th. The CIA is awesome, absolutely awesome! I have learned so much already, and its only been three weeks! I'm taking five classes: Culinary Math, Food Safety, First Year Seminar, Baking Ingredients and Equipment Technology, and Baking and Pastry Techniques. So far, I'm doing well in all of my classes. Chef Rudolf Spiess is my Baking and Pastry Techniques instructor. In his class, my classmates and I have made chocolate chip cookies, blueberry muffins, and pound cake.

On Thursday, I made my first cheesecake. It was easy to make, it didn't take very long to make, and it tasted great! The small depression on top of the cheesecake was a result of air getting trapped in the batter. This is something I'll have to remedy when making my second cheesecake. Also, I will be doubling the graham cracker crust recipe on my next attempt.

To make one 8" cheesecake, you will need the following ingredients:          

(Weighing ingredients is more precise than measuring by volume.)

Cream Cheese - 1.25 #
Granulated Sugar - 6 oz.
Eggs - 3
Egg Yolk - 1
Heavy Cream - 2.5 oz.
Cornstarch - .75 oz.
Graham Cracker Crumbs - 2 oz.
Butter, melted - 1 oz.

Preheat Oven To 200 Degrees Fahrenheit 

Step 1

Cream together the cream cheese and sugar. Use the paddle attachment on a planetary mixer for best results. Set the mixer on low speed, stop the mixer after about two minutes, and make sure you scrape the paddle and the sides of the bowl to ensure that all of the ingredients are thoroughly combined. Repeat this process until there are no lumps.

Step 2

Add the cornstarch to the heavy cream so it can completely dissolve. 

Step 3

Add the eggs in increments (3-4). After each addition, mix on low speed until the eggs are incorporated into the batter. Again, make sure to stop and scrape the paddle and sides of the bowl before adding the next increment.

Step 4

Add cornstarch/heavy cream mixture to the batter. Mix on low speed until thoroughly combined. Scrape the paddle and the sides of the bowl, and mix on low speed until there are no lumps.

Step 5

Melt the butter. Crush the graham crackers. Combine these ingredients.

Step 6

Spray the bottom and sides of an 8" baking tin with cooking oil spray. Place a piece of parchment paper on the bottom of the baking tin.

Step 7

Pour the graham cracker mixture into the baking tin. Use a fork to evenly distribute and pack down the mixture.

Step 8

Pour the batter into the baking tin. Try not to get any air bubbles trapped inside.

Step 9

Bake the cheese cake until you can shake the baking tin and the entire cheese cake moves as one. I left my cheese cake in a convection oven for about an hour, but baking times may vary. You don't have to worry about over carmelization (burning) the cheese cake because we're not taking it above 200 degrees Fahrenheit.

Step 10

Once your cheese cake is done baking, let it cool completely. After it is cool, place it in the refrigerator for about 20 minutes.

Step 11

Place a  piece of parchment paper on top of the cheese cake. Place a piece of cardboard on top of that. Turn the baking tin over. Use a propane torch and heat up the bottom and edges of the baking tin. This will melt the fat from the cooking oil spray, which will make your cheese cake come out with ease. Before you remove the baking tin, hold it vertically and tap it on a sturdy table, rotating it a quarter turn after each tap. Remove the baking tin, and turn the cheese cake right-side-up.

Variation

If you feel like flavoring your cheese cake, this is what you'll need to do:
Instead of adding 1.25 # (20 oz.) of cream cheese, add only 1# (16 oz.). After Step 4 is complete, add 4 oz. of your favorite flavoring and mix thoroughly. Yes, it's that simple! 

Enjoy!

This post is dedicated to the women and men who died while serving in the United States Armed Forces.

photo credit: Beverly & Pack via photopin cc

Wednesday, April 10, 2013

Why We Fight

In late February, I came across the following page on the JSU website:
I decided that I wanted to compete, so I wrote the following message and sent it in: 

Hi Lynne,
My name is Paul Lindsay. I'm interested in competing in JSU's Battle of the Chefs! 
I can win the competition! And I will win by preparing some of my most palatable recipes. I can cook for a single judge, a group of judges, or for many judges. I can compete with a signature dish, or I can prepare a few of my favorite recipes. I juice fresh fruits and vegetables. I make breakfast, lunch, and dinner. I make desserts. I have had experience in cooking for people that are able only to drink their meals through a straw. I'm able to either cook and present a dish, or cook all the dishes at the same time and present them together. 
If you would like to read about the first cooking competition that I competed in, please check out my blog: Paul Lindsay's Cooking Blog.
Please feel free to contact me with any additional information about the competition at: plindsay@jsu.edu
Thank you!
Best Regards,
Paul Lindsay

I received a message on March 5th saying that I would be one of the contestants in the Battle of the Chefs.


Preparation

The Battle of the Chef's was to be like the Iron Chef television show, and since I had never watched an Iron Chef episode, I felt it was prudent to do some research. I watched some YouTube videos of the show, and I read about who had won in the past and what worked for them. I found a great video of Michael Symon speaking to the students at The CIA about his Iron Chef experience. In the video, Symon says, "I kept saying - big flavors; great seasoning; and be smart." After I watched the video, that's exactly what I planned on doing at the Battle of the Chef's competition.

I asked my friend, Donna, to assist me in the competition, but she had to work on the day of the event. So, I asked her husband, Jeremy, to be my assistant in the competition. He accepted. 

To Battle

On the day of the Battle of the Chefs, Jeremy and I arrived early and started planning our menu. I decided that we should cook something simple, and also something that I was familiar with. Grilled shrimp and fried pineapple shish kebabs with a side of guacamole sauce would be my appetizer. My entrée included grilled lemon pepper chicken with sides of cauliflower, peppers, and toasted Italian bread. 

Click here for the results. 

In Retrospect

I learned a lot from competing. The biggest thing was not to serve something until I have tasted it. This is something that I had prepared for, but just failed to do during the event. I'm a fan of Gordon Ramsay and his television show Hell's Kitchen. He is constantly telling (and sometimes yelling at) the contestants to "taste everything before you serve it!"  I don't like eating in front of people, especially when they are all watching me cook. Knowing this, I devised a plan that would ease me into sampling the food before I would present the dishes to the judges - I filled a ceramic mug (one that I made this semester) with plastic sampling spoons. I put it at the front of my table, but I didn't use it at all. I cooked all the food, plated it, and served it - no taste testing. 
If I would have tasted the shrimp, I would have realized immediately that I had forgotten to put the Cajun seasoning on. After the awards were given out, executive chef Brian Cosby approached me and said, "everything was cooked perfectly, but I heard some of the judges hit you for unseasoned shrimp." I knew to put Cajun seasoning on the shrimp, I had the plastic cup filled with the necessary amount. I forgot to put it on, and then I forgot to taste it before I presented it to the judges. 

To Victory

I had a great time competing! When I return to Jacksonville in 4 years to make more ceramics, I look forward to trying out for the next Battle of the Chef's!
 

Wednesday, April 3, 2013

Peanut Butter Banana Sandwich

I like bananas. I eat bananas by themselves, in my cereal, in my ice cream, and in my pancakes. And when it comes to eating fruit salad, I always go for the bananas first. I love chocolate covered bananas, too.

But ever since I was a kid, I've always thought of Peanut Butter Banana Sandwiches as the best way to enjoy my favorite fruit. They are quick and easy to make, they taste great, and Peanut Butter Banana Sandwiches make for a great snack when you are working and don't have time to eat a full meal. 
I am taking a ceramics class at JSU, and I have a lot of work to do tonight! So, I thought a Peanut Butter Banana Sandwich would give me a nice boost of energy when I get about half-way through putting the finishing touches on my ceramic objects. 
I drove to the store to get some supplies; I needed some peanut butter and 2 bananas. I picked up the bananas first and then headed to the peanut butter section. Then I saw it - a new jar of peanut butter sitting on the shelf. When I saw the Jif Natural Creamy Peanut Butter Spread and Honey I decided to buy a jar and try it out.
I'm glad I did; I give this peanut butter 2 thumbs up! The first half of my Peanut Butter Banana Sandwich was delicious, and I'm looking forward to having the other half when I go back to school this evening!
Enjoy! 


Wednesday, March 20, 2013

To The Dogs

In a recent post, I wrote about my experiences in Baghdad. After that deployment, I requested to attend the Military Working Dog Handler course at Lackland Air Force Base in San Antonio, Texas. At the graduation ceremony, I was honored with the Top Dog award for obedience. I was then assigned to Fort Richardson, Alaska. When I arrived, I was paired up with Lux, a 2 year old German Shepherd. Lux and I were the only certified drug detection team on the base, so we stayed pretty busy. I worked with Lux until I was discharged from the Army, and I was sad that I had to leave him.


When I became a civilian again, I drove from Alaska to my hometown - Chardon, Ohio. At this point of my life, I was confused, sad, frustrated, and unsure of my future. To remedy my situation, I decided to get a puppy! I called Geauga Humane Society's Rescue Village until they told me that they had 10 puppies I could choose from. I drove to the animal shelter, and by the time I arrived, all but 2 of the puppies had found a home. The lady at the shelter told me that the puppies were found by a couple walking through a local park. The rescue shelter raised the puppies until they were old enough to have the necessary immunizations, at which point someone could adopt them. The shelter was able to feed the puppies only what food was donated. Rescue Village fed them baby bottle formula, and the puppies did not receive the nutrients and minerals that are essential for development. This caused the puppies to develop cataracts. So, I had 2 blind puppies to choose from. I put them both on a couch, one on each side of me. One of the pups wandered away from me, and the other walked towards me, bumped into me, and started licking my hand. I wanted to take them both, but I decided to take the one that was more curious about me. I named him Jude, and he's been my best friend ever since!


When I first brought Jude home he was pretty much blind - he ran into a barn, countless trees, picnic tables, chairs, people, and anything else that was in his way. The veterinarian recommended that I feed him Purina ONE® SMARTBLEND® Lamb & Rice Formula, to help with his vision. As Jude grew older, his vision got better. He still bumps into things, but not nearly as much as he did when he was a puppy. He is very much like the superhero Daredevil. Although his vision is impaired, Jude's remaining four senses function with high levels of sensitivity and accuracy; few know that he cannot see


Jude and I moved to Alabama so that I could start my education at Jacksonville State University. During the summer of my sophomore year, I visited my friends in Albertville, Alabama. Joe and Sherry's dogs (Sasha - a German Shepherd & Bama - a Chocolate Lab) had a litter of puppies, and they told me that I could take one home if I wanted to. I did! While I was driving home, I glanced down at this beautiful, 1-week-old puppy and decided that her name would be April. 


The nice, quiet life that Jude and I had been living, ended when April arrived. If Jude were to be a Jedi Knight, then April would have to be considered a Sith Lord. As a puppy, April destroyed my golf shoes, a textbook, the carpeting in my house, and most of my flowers, shrubs, and trees.


Even if I came home from school and my house, personal possessions, and plants were decimated, I was still happy that the dogs had each other to play with. It took some time, but I eventually got April under control. We were now one big happy family!


Dogs need love. So, give them as much of it as possible! Here are a few other tips on how to do be a good dog owner:
  1. Provide the best veterinarian care available. This includes: regular checkups, receiving all the necessary shots and medicines, nail trims, and flea and tick prevention.
  2. Teach your dogs to do what you want them to do. I've taught April and Jude how to sit, shake (shake with right paw), paw (shake with left paw), lay down, jump up, stay, get back, heel, and I taught them both how to retrieve golf balls, too.
  3. Praise your dogs every time they do what you tell them to do. There are 2 types of praise - physical praise (rubbing, petting, massaging, etc.) and verbal praise (clapping your hands, whistling, "good boy/good girl," etc.). To be more effective, use both types of praise at the same time.
  4. Correct your dog every time they don't do what you tell them to do. There are 2 types of corrections physical correction (pulling back on a leash hooked up to the collar or choke chain) and verbal correction ("NO"). To be more effective, use both types of corrections at the same time. Then, restate the original command. Praise the dog if it does what it's told to do. Correct the dog if it disobeys, and start this process over.
  5. Keep your dog clean. My dogs take a shower with me every Friday morning; they know it as "tub-tub time." I wash them with Pantene Pro-V shampoo and conditioner.
  6. Feed your dog. April and Jude are fed 2 meals per day; breakfast is served at 6:00 am, and dinner is served at 6:00 pm.
 

April and Jude love human food, too! When I cook for myself at home, I always prepare a little something extra to share with them. Some of their favorite foods are: steak, chicken, fish, pasta, peas, tomato sauce, and peanut butter crackers. We all enjoyed a nice steak lunch this afternoon!

  
In closing, here's a quote from the book I'm reading. James Herriot wrote, "It is always said that however many wonderful and happy years a dog lives, you know that one day, the day he dies, your dog will break your heart." He continues, "I have always advised people to get a replacement as soon as possible after their dog has died: a new and endearing pup helps enormously to fill the gaping void one always experiences after a much-loved dog has gone." I agree wholeheartedly with his philosophy. And I'll be taking his advice, when the time comes. Until then, I am quite content with my 2 big, black, beautiful dogs - April and Jude.

 To The Dogs